If you are not familiar with Dungeons & Dragons, there are two general flavors for how to play:
- Using miniatures and a map, or
- Theater of the mind.
This reminded me of all the times that I would play with my daughter when she was little.
 Mandaris
If you are not familiar with Dungeons & Dragons, there are two general flavors for how to play:
- Using miniatures and a map, or
- Theater of the mind.
This reminded me of all the times that I would play with my daughter when she was little.
I have 46 items in drafts that I want to pursue. Just the time and energy isn’t there.
I want to shout out to omg.lol and relay.fm for continuing their fundraiser to cure childhood cancer.
Here is URL for those who want to donate.
If you’re going to break your site in production, make sure you fix it before anyone notices.
Not speaking from experience… 😏
Two weeks ago, my wife told me that we should start looking for new phones for our daughters because they have been having performance problems for the last couple of months. They are both using a 6th generation iPhone and seeing limits with battery life and a couple inconvenient os incompatibilities. My wife said that we should buy a new phone for ourselves and hand down our iPhone SEs to them.
So I was really excited about what this Apple event was going to bring.
And I am excited about the upcoming camera control button and I’m excited about just moving up from what I previously had. I understand that just because it’s a new phone and it’s a year over a year change it’s not always going to be exciting.
But, this release feels kind of weird it feels almost as if there wasn’t a lot there.
I think the problem is that with the upcoming release. There’s a lot of things that are being promised by Apple Intelligence. Which is something that I don’t really want.
I feel that ultimately we are moving towards a product that I am no longer the target audience for. And there’s nothing wrong with that; not every product is going to be made for me.
The uneasiness that I feel is that I no longer know what that product is going to be.
Am I being materialistic in hopes that some magical tool will made? Or, am I sad that they don’t make them like that anymore
?
It feels in all the discussion about AI coming to iOS and Mac, I don’t think anyone has mentioned how much this is going to cost.
Service revenue is becoming more and more important to Apple.
iOS meh-teen
Wish I could see the debate, if only to see an example of how to deal with “certain people”.
I didn't know that I was going to enjoy this as much as I did.
This show harkens back to the old school gods. The fickle
ones that would smite you down because of a petty slight or demand that you kill your children because the will it so.
A long way from Disney’s Hercules. There is murder (patricide, infanticide, and everything in between), sex (quite a bit), and just a whole lot of creepiness.
Honestly, I didn’t think that I would like it but I found myself caught up in the execution of the story.
I think this is definitely a show for anyone who is a fan of Jeff Goldblum. I haven’t seen all of his movies, but he certainly knows how to show someone slowly crumbling under paranoid. It’s how I imagine minions working under some comic book villain; it’s not a matter of if but when he’s going to kill you.
And that’s part of it all.
Zeus comes from a horrible upbringing, and in a lot of ways, it’s stuck with him and as the King of the Gods
no-one has been able to tell him no. Not a recipe for good mental health.
The other actors round out the cast pretty well but there are quite a few times where it felt that things happened because the plot dictates it.
I don’t think we’re going to see another season of this, but I’m so happy that we got this one.

Overview
As discord reigns on Mount Olympus and almighty Zeus spirals into paranoia, three mortals are destined to reshape the future of humankind.
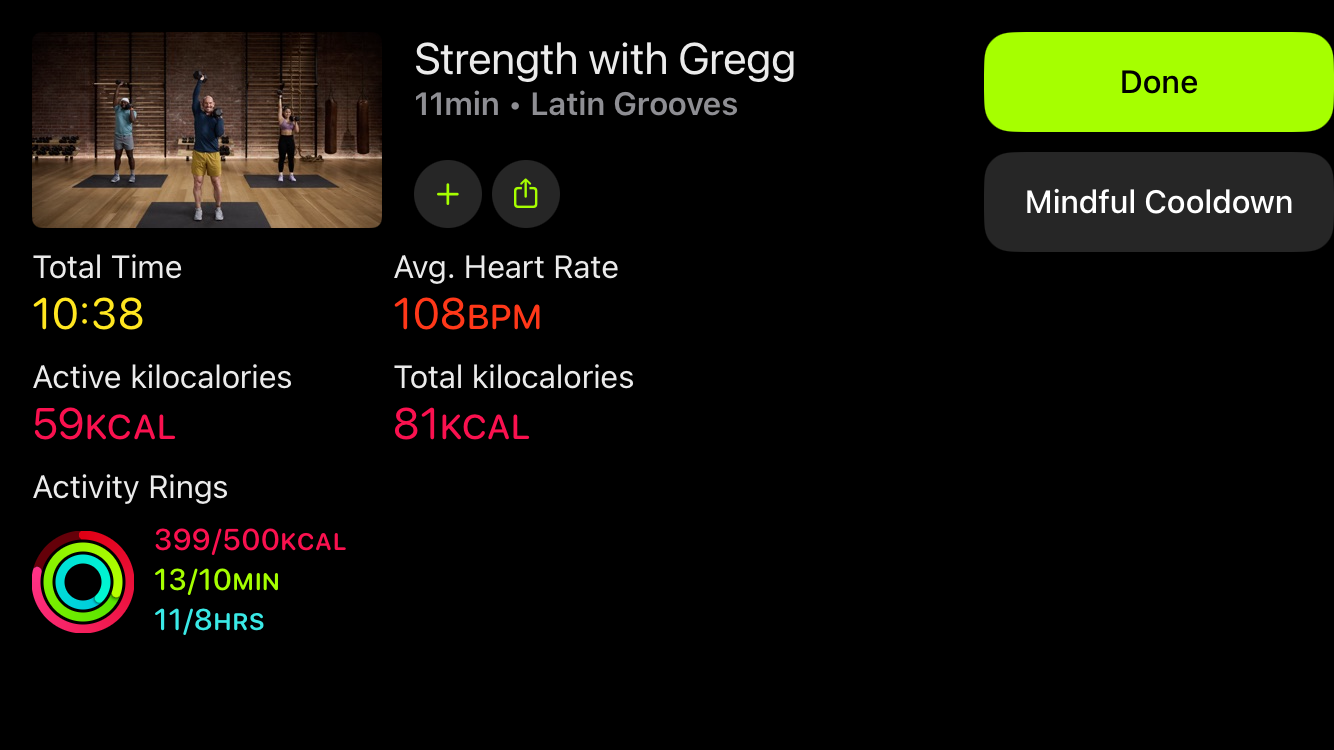
Afternoon exercise.